“A spark neglected makes a mighty fire.”
~ Robert Herrick (1591-1674)
I view fires as a very occasional luxury or an emergency measure, rather than a regular part of my backcountry routine. Nonetheless, knowing how to start and maintain a fire is a valuable skill, which in a survival situation can potentially be life-saving.
Places Where You Should Not Build a Fire
- Anywhere that wood resources are limited (e.g. above tree line).
- In the vicinity of remote villages in developing countries. The locals definitely need the wood more than you do.
- Most importantly, anywhere that fire danger is a possibility. Always be aware of fire regulations and/or restrictions in the area in which you are hiking. Be cognizant of any changes in weather conditions. Many bush fires have resulted from hiker’s ignoring the warning signs (i.e. hot, dry winds) and building fires regardless.

Collecting Firewood
- A combination of tinder, kindling and larger pieces of wood is required.
- Tinder (e.g. dry grass, leaves, pine needles, fire shavings, thin strips of bark) provides the initial spark.
- Kindling (small twigs) helps to raise the flames.
- The bigger pieces of wood consolidate the fire.
- Tinder and kindling should always be dry. In wet conditions, collect tinder along the trail before making camp; put it in your jacket and let your body heat do the rest.
- Places to look include underneath hanging rocks or logs and at the base of large trees.
- Another option is to find sticks that aren’t excessively wet, and progressively shave them down until you reach dry wood (i.e. feather stick). The finer the shavings the better. Irrespective of the conditions, it is always a good idea to carry an emergency fire starter (see below for options).
- Splitting or snapping sticks is helpful as the dry inner wood and edges make for easier burning.
- Avoid soggy or rotten wood.
Emergency Fire Starters
Sometimes dry tinder and kindling can be hard to find. That being the case, it is wise for the hiker to always carry an emergency fire starter. Listed below are five lightweight and reliable options:
- Vaseline coated cotton balls
- Light my Fire / Swedish FireSteel
- Trick birthday candle
- Dryer lint
- Fritos corn chips (or similarly oily equivalent) – Thanks to Justin “Trauma” Lichter for this last tip.

Mound Fire
If camping in established sites, use existing fire rings whenever possible. In pristine areas, a mound fire represents the lowest impact option available.
Preparation
- Find a sheltered spot removed from standing trees. Clear away any dried grass, twigs or leaves until you are left with a bare surface approximately 1.5 metres (5 ft) in diameter. Place a groundsheet/fire blanket on the cleared site.
- Fill a stuff-sack with mineral soil, which ideally should be gathered from an already impacted surface such as a dry riverbed.
- Pour the bag’s contents onto the sheet/blanket and create a flat-topped mound that measures approximately 60 cm (2 ft) in diameter and 15 cm (0.5 ft) in height.
- The depth is important, as this is what insulates the ground below from the damaging effects of the fire. Ensure that the circumference of the mound is bigger than the proposed fire.
- I suggest tucking the edges of the groundsheet/fire blanket underneath the mound to prevent embers from damaging the material.
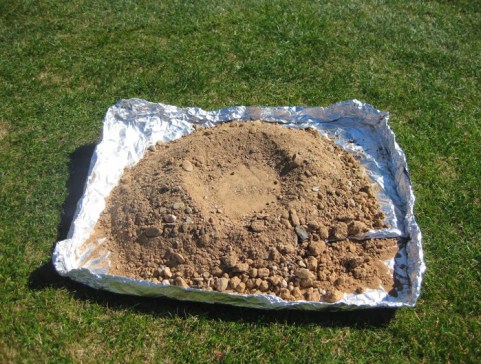
Mound fire (photo courtesy of Lnt.org)
Starting & Maintaining the Fire
Three main points to remember: 1. Suitable wood; 2. Good airflow; 3. Sustained heat.
There are various techniques for starting fires. The Tee Pee (link to video) method is one of the simplest and most effective.
- Begin by placing a small amount of tinder in the middle of your mound.
- Surround the tinder with a Tee Pee arrangement of small kindling. Leave space amongst the twigs to light the tinder.
- As the fire begins to catch, gradually add progressively larger pieces of wood to your Tee Pee.
- Be sure to allow for good airflow between the firewood at all times.
- Use dry wood at first and then once the fire is established, dampish wood should be fine.

Leave No Trace
- Always extinguish your fire before going to sleep.
- Once the wood has burned down to a fine white ash, ensure that the fire is extinguished by pouring water on the embers until steam ceases to rise.
- Once it has cooled sufficiently (check it with the back of your hand; if it is too hot to touch, you need to keep dousing), spread the ashes evenly over a large area away from the fire site.
- Using your groundsheet/fire blanket, pick up the mineral soil which constituted your mound and return it from whence it came.