“Snowflakes are one of nature’s most fragile things, but just look at what they can do when they stick together.” ~ Vista M. Kelly
Wilderness travel can be unpredictable. Never is this more true then when backpacking in snow. Conditions can vary dramatically depending on the season, terrain and/or recent weather patterns. When venturing into snowy areas a hiker needs to be on their “A-Game.” The margin for error is often less than it would be in other types of environments.
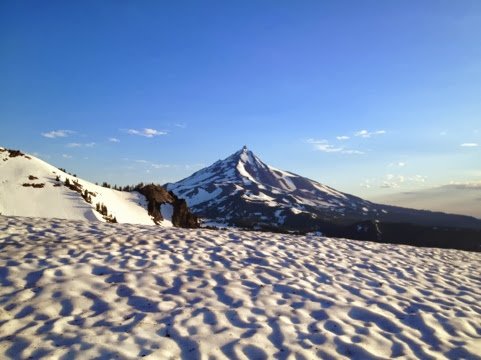
Just south of Mt.Jefferson, during a 40 mile snowbound stretch on the Pacific Crest “Trail” | Oregon, USA, 2012
10 Tips for Hiking in the Snow
1. Current Conditions: While planning your hike, obtain as much up-to-date information as possible in regards to current conditions. Double-check the short and long-range forecasts before departure.
2. Route Planning: Study the topography of your proposed route. Identify potentially hazardous areas such as those that may be prone to avalanches and know where evacuation routes are situated in case of an emergency.
3. Sunscreen: Apply it early and often. Don’t be fooled by cooler temps. The reflective quality of snow has caught many an experienced hiker unawares. Don’t forget to apply it in areas such as under your nose, ears and chin. If you are hiking in shorts, be sure to spread it liberally over the back of your legs.
4. Sunglasses: To continue on the solar theme, don’t forget to bring sunglasses. I kid you not, snow blindness rates right up there with a roaring case of hemorrhoids on the old fun-o-meter.
5. Cliffs & Avalanches: Avoid routes that take you too close to the edge or base of cliffs. Any snow slope, no matter what its gradient, has the potential to slide. The steeper the angle, the greater the probability. For an overview of avalanche basics, click on the following link from Princeton University’s Outdoor Action website.
6. Rocks: When crossing snowfields in the spring avoid going too close to rocks, where the snow will be softer due to warmer temperatures heating the rocks.
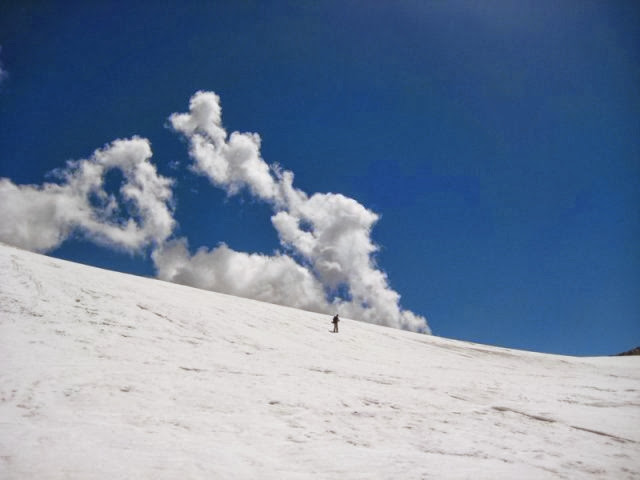
Descending from Pakora Pass (4710 m / 15,543 ft) | Karakorum Range, Pakistan, 2008.
7. River crossings: When hiking in the spring-time snow, be cognizant of potential changes in water levels in streams and rivers. As temperatures start to warm, glacier and snow-fed rivers start to rise. Whenever possible, try to negotiate challenging fords early in the morning when water levels will be lower.
Note that if the watercourse is partially covered by snow, it is often it is better to suck it up and hike through the cold water rather than to risk crossing a thin snow bridge that may not hold your weight.
8. Timing Your Day is a big factor in hiking efficiently on snow. Preparation is key. Be aware of the location and profile of river crossings and mountain passes (e.g. north or south facing?) and whenever possible adapt your itinerary accordingly.
- Mornings: When hiking in snowy terrain, your cause will be aided considerably by making early starts. The snow is harder and the going is easier. As a wise old Norwegian once told me, “it’s a lot more enjoyable walking on top of snow than wading through it.”
- Passes: Avoid going over passes too early when the snow will likely be frozen (i.e. very slippery and difficult to gain footholds). Similarly, you don’t want to leave your run too late. By early/mid-afternoon the sun may have softened the snow to the point that you could spend the rest of your afternoon postholing down the other side.
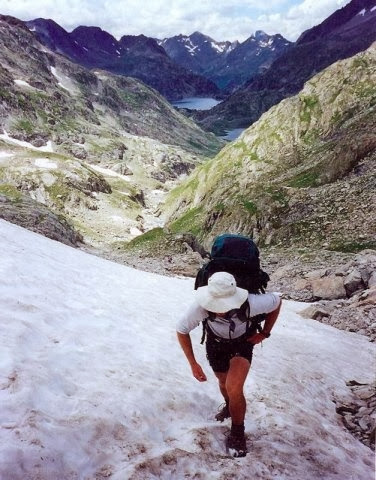
Ascending a pass on the Pyrenees High Route | 1999
9. Know your limits: Problems in the backcountry can occur when folks bite off more than they can chew. A willingness to improve your skillset, should always be tempered by a realistic assessment of one’s knowledge and experience at the time. Never be afraid to turn around and/or look for an alternative route if your chosen path appears to be overly dangerous.
10. Perspective: Hiking on snow can be slow going. Your daily mileage will go down. Your feet may be soaked. Occasionally you will posthole (i.e. the process by which a hiker sinks lower than shin depth whilst walking on soft snow) for hours on end………all wonderful fun!
Whether or not you have a good time often comes down to perspective. Stay positive, be patient, retain your sense of humor and most importantly, always be adaptable.
10 Tips for Snow Camping
Many hikers have a thing about camping on snow. “It’s cold, wet and to be avoided if possible.” In reality, it’s no biggie so long as certain measures are taken:
- Camp chores take longer in colder weather. Aim at arriving at your campsite a little earlier than usual.
2. Scan your campsite for dodgy looking, snow-laden branches or wobbly trees that may have taken a beating during a recent snowstorm. No one likes a 50 lb branch dropping on their shelter at 3 am.
Lake Manasarovar Kora | Tibet, 2006.
3. Pack down the snow before setting up your tent. This helps to expedite the sintering process and makes for a more comfortable night’s sleep.
4. Staking out your tent: If you know that there is a good chance you will be camping on snow, bring along some snow-specific stakes or alternatively improvise by making “deadman” anchors, using standard tent pegs or sticks.
5. Cooking: One of the things you always hear from tent manufacturers is to never cook in your tent. It’s good advice.
Once a flame catches, synthetic tent materials can light up quicker than a hippy at a Grateful Dead concert. If you can’t bring yourself to brave the elements and chocolate bars just aren’t going to cut it, consider opening your shelter door and cooking in the tent’s vestibule. A few tips:
- Dig out a small, even platform to place the stove upon.
- Have all your ingredients ready to go and easy access; you don’t want to accidentally knock your stove over while fumbling around looking for an extra packet of Ramen.
- If you are using a liquid gas stove, prime it outside the tent so it doesn’t flare up close to your shelter.
- Don’t multi-task while cooking in your vestibule; accidents generally happen when you’re not paying attention. Back in the mid-90s, I burnt the crotch out of a pair of rain pants because I got distracted; the situation could have been considerably worse if I hadn’t quickly noticed the warm fuzzy feeling down below!
6. Insulation: When camping in sub-freezing conditions the key to a good night’s sleep is insulation. You may have a super warm sleeping bag, but if you don’t have sufficient insulation from the ground you are going to be cold (i.e. conductive heat loss). In such conditions, I will often combine a closed-cell foam mat with a lightweight inflatable.

Paul “Mags” Magnanti (photo courtesy of www.pmags.com).
7. Pee Bottle: If you don’t fancy heading out for a pee at 3am in -15 degrees, bring along a dedicated wide-mouth bottle. Be sure not to confuse it with your regular drinking water bottles. This particularly holds true if you are hiking with a partner.
8. Dry out your socks and/or gloves at night. Put them down your pants or even under your beanie. For larger items such as shirts or shorts, I will normally lie them flat against my body or when it’s really cold, employ them as a “midlayer” (i.e. Sandwiched between two dry layers). One place you don’t really want your wet clothing is down the end of your sleeping bag in a bundle where it can compromise the loft of your sleeping bag.
9. Wet Shoes: If temps are below freezing, put wet shoes in a plastic bag or waterproof stuff sack and place them inside your backpack. No one likes putting on frozen footwear first thing in the morning.
10. Water Bottles: The same principle applies to water bottles. If you want to have one handy during the night, wrap it up in some extra clothes or socks and place it either inside your sleeping bag.
Ice Axe for Hikers
For hiking purposes, an ice axe’s principal use is to arrest slips or falls when traversing steep, snowy terrain. There are three main points to remember in regards to self-arrest:

1. Practice: Taking a course on basic ice axe skills represents a good investment in your own safety and peace of mind. Failing this, check the internet for step-by-step instructions (click here for an instructional video from the British Mountaineering Council) or ask for a lesson from experienced friends. Once you have the theory down, practice your self-arrest technique on progressively steeper snow slopes. This is not a skill you want to be learning whilst tip-toeing across an icy 40 degree slope!
2. It’s Not a Panacea: Knowing how to self-arrest does not replace good judgment and footwork as your primary tools for safely traversing steep snow slopes.
3. An ice axe is just a pack decoration unless you have it in your hand when you actually need it.
Glissading
Glissading is fun, exciting & potentially hazardous to your health. Six points for hikers to remember in regards to glissading:

Joshua “Bobcat” Stacy at the end of a 1200 ft glissade on the Lowest to Highest Route | High Sierra, CA, 2014
1. Never glissade if you are in any doubt as to the safety of a slope (e.g. crevasses, avalanche potential, protruding rocks or debris).
2. Assess the runout. If it isn’t fully visible, don’t glissade.
3. Make sure all of your gear is stored inside your backpack or safely secured.
4. Don’t glissade while wearing crampons. The same goes for microspikes. Even though the spikes are shorter and the chances of them catching are less (particularly when the snow is slushy), it’s better to be safe than sorry.
5. Use your ice axe in self-arrest position to control speed.
6. Assuming that all of the above boxes are ticked, a minimum of three whoops and hollers is considered mandatory for your standard sitting glissade. 🙂
Videos: How not to glissade & Glissading on Mt. Shasta
Sources of Information
There is no substitute for practical experience, however, the following sources provide a good overview of the theoretical knowledge one needs in order to hike safely in snowbound terrain.
- Books: Two books immediately come to mind. The first is the authoritative, Mountaineering: The Freedom of the Hills. Although written for climbers and mountaineers, this book/encyclopedia pretty much covers all the information hikers need to know for excursions into snow country (e.g. avalanche evaluation, techniques for efficient snow travel, glissading and self-arrest). The second book is Buck Tilton’s, NOLS Winter Camping (2005). Aimed more specifically towards backpackers, this book provides practical advice on clothing, safety, planning, travel and setting up camp.
- Online: For online information, try Princeton University’s excellent Outdoor Action website.